The Honeywell TH6220D1028 is a programmable thermostat from the FocusPRO 6000 series, designed for single-stage and multi-stage heating and cooling systems. It offers EnergyStar certification, a large backlit display, and Adaptive Intelligent Recovery for efficient temperature control. With a sleek design and user-friendly interface, it provides precise climate management and energy savings.
1.1 Overview of the Honeywell TH6220D1028 Model
The Honeywell TH6220D1028 is a programmable thermostat from the FocusPRO 6000 series, designed for single-stage and multi-stage heating and cooling systems. It features a large backlit display for easy readability and offers advanced functionalities like Adaptive Intelligent Recovery, ensuring programmed temperatures are reached on time. With EnergyStar certification, this thermostat promotes energy efficiency and supports 750 mV heating systems. Its universal design makes it compatible with most HVAC systems, providing reliable and precise climate control. The thermostat is installed at 5 feet above the floor for accurate temperature sensing and optimal performance.
1.2 Key Features of the Honeywell TH6220D1028
The Honeywell TH6220D1028 thermostat features programmable weekday and weekend schedules, allowing users to customize their comfort settings. Its One-Touch Away mode overrides the schedule for temporary adjustments. The thermostat offers Adaptive Intelligent Recovery, which ensures the set temperature is reached by the programmed time. With EnergyStar certification, it promotes energy efficiency. The large backlit display enhances readability, and the universal compatibility ensures it works with most 24V HVAC systems. This model supports single-stage, multi-stage, and 750 mV heating systems, making it versatile for various home setups. It also includes a built-in instructions guide for easy setup and operation.
Preparation for Installation
Before installing the Honeywell TH6220D1028, gather tools like a screwdriver and drill. Ensure the HVAC system is turned off for safety. Verify thermostat compatibility with your heating/cooling system and choose an ideal location for installation, typically 5 feet above the floor. Remove the old thermostat and prepare the wall for the new wallplate installation. Refer to the manual for specific compatibility checks and safety guidelines to ensure a smooth installation process.
2.1 Tools and Materials Needed
To install the Honeywell TH6220D1028 thermostat, you will need a screwdriver, drill, and bits for drilling holes. Additional tools include a wire stripper for trimming wires and a level to ensure proper wallplate alignment. Materials required may include drywall anchors or plaster plugs, depending on your wall type. A voltage tester is recommended to ensure the power is off before starting. For optimal installation, consult the manual for specific tools and materials tailored to your system. Always prioritize safety by turning off the HVAC system before beginning. Gather all items beforehand to streamline the process.
2.2 Safety Precautions
Before starting the installation, ensure the HVAC system is turned off at the circuit breaker or fuse box to avoid electrical shock. Verify the power is off using a voltage tester. Do not touch internal components of the thermostat or wiring without proper insulation. Wear protective gloves and safety glasses if necessary. Follow all local electrical codes and regulations. Keep the area clear of debris and flammable materials. Avoid overheating the thermostat or damaging the wiring during installation. Always refer to the manual for specific safety guidelines tailored to your system. Safety compliance ensures a hazard-free installation process.
2.3 Understanding the Thermostat’s Compatibility
The Honeywell TH6220D1028 is compatible with single-stage and multi-stage heating and cooling systems, including 750 mV heating systems. It requires a 24VAC power supply and works with conventional, heat pump, and dual-fuel systems. Ensure your HVAC system matches these specifications for proper operation. Check the wiring configuration to confirm compatibility with the thermostat’s terminal connections. Incompatible systems may lead to malfunction or damage. Always verify the system type before proceeding with installation to ensure seamless integration and optimal performance. Proper compatibility ensures reliable temperature control and energy efficiency.
Installation Instructions
The installation process involves removing the old thermostat, installing the wallplate, drilling holes, and mounting the new thermostat. Follow the step-by-step guide carefully.
3.1 Removing the Old Thermostat
Before installing the new Honeywell TH6220D1028, ensure the power to your heating/cooling system is turned off at the circuit breaker. Gently pull the old thermostat away from the wall to access the wires. Carefully disconnect the wires from their terminals, taking note of their colors and positions for future reference. If the old thermostat is held in place by screws, remove them carefully to avoid damaging the wall. Once the wires are free, remove the thermostat completely. Handle the wires with care to avoid damage or tangles.
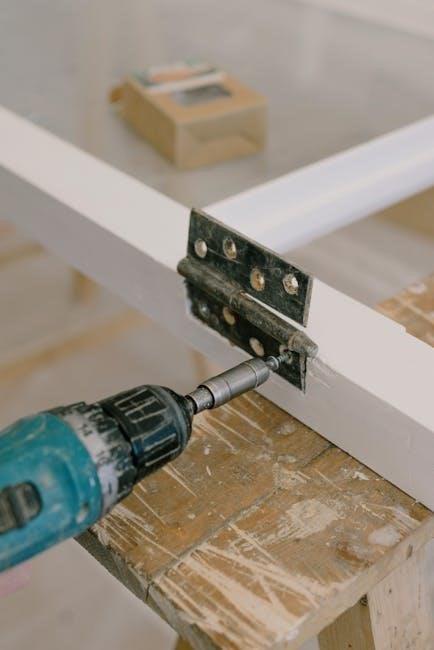
3.2 Installing the Wallplate
Begin by removing the wallplate from the Honeywell TH6220D1028 thermostat. Insert your finger into the wire hole and gently pull the wallplate away from the device. Ensure the wallplate is level and position it against the wall where you want to mount it. Mark the screw holes with a pencil. For drywall, drill 3/16-inch holes, and for plaster, use 7/32-inch holes. Insert wall anchors if necessary. Mount the wallplate using the provided screws, ensuring it is secure and even. Handle the wires carefully to avoid damage during this process. Tighten the screws firmly to complete the installation.
3.3 Drilling Holes for Wallplate Installation
To install the wallplate, begin by marking the screw hole locations using a pencil. Ensure the wallplate is level for proper installation. For drywall, drill 3/16-inch pilot holes at the marked positions. If you have plaster walls, use a 7/32-inch drill bit instead. Drill carefully to avoid damaging surrounding areas. The holes should be about 1 inch deep to accommodate the screws securely. If your wall lacks studs, consider using wall anchors to prevent the screws from loosening over time. After drilling, proceed to mount the wallplate, ensuring it is straight and firmly attached to the wall. Handle the wires with care during this process.
3.4 Mounting the Thermostat
After installing the wallplate, remove it by inserting your finger into the wire hole and pulling gently. Align the thermostat with the wallplate, ensuring it is level. Secure the thermostat using the provided screws, tightening them firmly. Handle the wires carefully to avoid damage. Once mounted, check that the thermostat is level and properly seated on the wallplate. The thermostat should be installed approximately 5 feet above the floor for accurate temperature sensing. Ensure the area around the thermostat has good air circulation to ensure precise temperature readings and optimal performance.

Wiring the Honeywell TH6220D1028
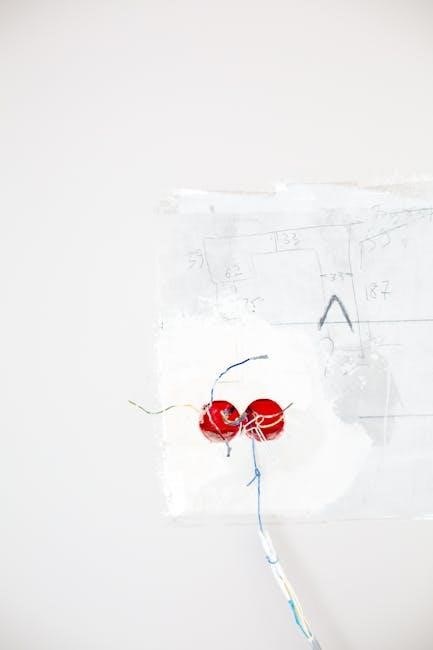
Identify terminal connections and match wires from your old thermostat to the new one. Ensure correct wire assignment for R, W, Y, G, C, and Rh terminals. Always check for a common wire if required and test the wiring configuration to confirm proper system operation.
4.1 Identifying Terminal Connections
Identify terminal connections by referring to the wiring diagram in the Honeywell TH6220D1028 manual. Match each wire from the old thermostat to the corresponding terminal on the new one. Common terminals include R (24V power), W (heating), Y (cooling), G (fan), C (common), and Rh (heating 24V). Ensure correct wire assignment to avoid system malfunctions. If replacing an old thermostat, label wires before disconnecting to simplify the process. Proper identification and labeling are crucial for a smooth installation and system operation. Always turn off power at the circuit breaker before handling wires.
4.2 Connecting the Wires
Connect the wires to the Honeywell TH6220D1028 thermostat by matching each wire to the correct terminal. Securely attach the R wire to the R terminal for 24V power. The W wire connects to the heating terminal, while the Y wire links to the cooling terminal. The G wire controls the fan, and the C wire provides a common connection. If present, the Rh wire connects to the heating 24V terminal. Ensure all connections are tight and properly seated. Avoid crossing wires or forcing them into incorrect terminals. Always turn off power at the circuit breaker before handling wires to prevent electrical shock or damage.
4.3 Testing the Wiring Configuration
After connecting the wires, restore power to the HVAC system and thermostat. Turn the thermostat to “Test” mode to verify proper operation. Check that the display lights up and functions correctly. Test heating and cooling modes by selecting them and ensuring the system activates. Verify that the fan operates when the G wire is connected. If any wires are misconnected, the thermostat may display error codes. Consult the manual to resolve any issues. Once all functions work smoothly, proceed to programming the thermostat for optimal performance. Proper testing ensures reliable operation and prevents future malfunctions.

Programming the Thermostat
Programming the Honeywell TH6220D1028 allows users to create customized temperature schedules for weekdays and weekends, ensuring energy efficiency. The programmable feature enables precise temperature control, while One-Touch Temp override provides flexibility when needed. The thermostat also supports Adaptive Intelligent Recovery, which ensures the set temperature is reached by the scheduled time. These features make it easy to balance comfort and energy savings throughout the day. Proper programming optimizes performance and reduces energy consumption.
5.1 Setting Up the Programmable Schedules
The Honeywell TH6220D1028 allows you to create separate programmable schedules for weekdays and weekends, ensuring tailored temperature control. To set up schedules, navigate to the program menu and select the desired days. Set temperature levels for four distinct periods: wake, leave, return, and sleep. The thermostat’s intuitive interface makes it easy to customize these settings. Once programmed, the system automatically adjusts temperatures, optimizing comfort and energy efficiency. Use the One-Touch Temp feature to override schedules temporarily without disrupting the overall program. This ensures flexibility while maintaining energy-saving benefits. Proper scheduling enhances performance and reduces energy consumption effectively.
5.2 Customizing Temperature Settings
The Honeywell TH6220D1028 allows precise temperature customization to meet your comfort needs. Users can adjust temperature levels for heating and cooling modes, ensuring optimal comfort. The thermostat features a backlit display for easy navigation. You can set temperature ranges, differential settings, and cycle rates. Customizing these settings helps improve energy efficiency and system performance; The thermostat also supports temporary overrides, enabling quick adjustments without altering the programmed schedule. By tailoring temperature settings, you can enhance comfort and reduce energy consumption, making it ideal for various home environments. Proper customization ensures the system operates efficiently and effectively, meeting your specific requirements.
5.3 Using the One-Touch Temp Control
The One-Touch Temp Control feature on the Honeywell TH6220D1028 allows users to override the programmed schedule temporarily. By pressing the “Hold” button, you can set a specific temperature that remains until the next scheduled period. This feature is ideal for occasions when you need immediate comfort adjustments without altering the entire program. The thermostat will revert to the programmed schedule automatically, ensuring energy efficiency and convenience. This function simplifies temperature management and provides flexibility for unexpected changes in your daily routine or comfort preferences.
Advanced Features of the Honeywell TH6220D1028
The Honeywell TH6220D1028 features Adaptive Intelligent Recovery and EnergyStar certification, ensuring energy efficiency and precise temperature control. Its advanced capabilities optimize comfort and reduce energy consumption effectively.
6.1 Adaptive Intelligent Recovery
Adaptive Intelligent Recovery ensures the Honeywell TH6220D1028 reaches the programmed temperature by the scheduled time. This feature optimizes heating or cooling operations, learning the system’s behavior to deliver consistent comfort efficiently. By adapting to the system’s performance, it minimizes temperature fluctuations and enhances energy savings. This intelligent recovery function is particularly useful for maintaining a comfortable environment without unnecessary energy consumption, making it a standout feature for homeowners seeking both convenience and efficiency.
6.2 Energy Efficiency and EnergyStar Certification
The Honeywell TH6220D1028 is EnergyStar certified, ensuring it meets strict energy efficiency standards set by the U.S. EPA. This certification guarantees that the thermostat helps reduce energy consumption without compromising comfort. By optimizing heating and cooling usage, it lowers utility bills and minimizes environmental impact. With features like programmable schedules and adaptive recovery, the thermostat promotes sustainable energy use, making it a cost-effective and eco-friendly choice for homeowners. Its energy-efficient design aligns with modern environmental goals, providing long-term savings and reliability.
Troubleshooting Common Issues
Identify common issues like wiring errors, display malfunctions, or programming glitches. Refer to the manual for solutions or contact Honeywell support for assistance.
7.1 Common Installation Mistakes
One common mistake during installation is incorrect wiring connections. Ensure terminals match the old thermostat’s configuration. Another error is improper wallplate installation, which can cause uneven mounting. Additionally, failing to level the thermostat may lead to inaccurate temperature readings. Drilling incorrect hole sizes for wall anchors can damage the wall or compromise the thermostat’s stability. Always follow the manual’s instructions carefully to avoid these issues and ensure proper functionality.
7.2 Resolving Wiring Issues
Wiring issues are common during thermostat installation. First, ensure the power is turned off at the circuit breaker. Identify each wire by its terminal label (e.g., R, W, Y, G, C) and compare it to the old thermostat’s configuration. Loose connections or incorrect terminal assignments can prevent proper operation. If the thermostat lacks a “C” wire, check for internal power options or use a compatible adapter. Consult the manual for terminal compatibility and test the system after wiring to ensure functionality. Proper wiring ensures accurate temperature control and system performance.
7.3 Addressing Programming Errors
Programming errors can prevent your thermostat from functioning correctly. Start by reviewing your programmed schedules to ensure they are set accurately. Verify that the weekday and weekend schedules align with your preferences. If the thermostat overrides the program unexpectedly, check the One-Touch Temp Control settings to ensure it’s not activated. Additionally, ensure temperature limits are set within a valid range (e.g., heating below cooling). If issues persist, reset the thermostat to factory settings and reprogram it. Always refer to the manual for detailed instructions on customizing and troubleshooting program settings.
Maintenance and Care
Regular maintenance ensures optimal performance. Clean the thermostat screen and internal components to prevent dust buildup. Check battery levels and replace them as needed. Update software periodically to enhance functionality and efficiency.
8.1 Cleaning the Thermostat
Cleaning the Honeywell TH6220D1028 is essential for maintaining functionality. Use a soft, dry cloth to gently wipe the display and exterior. Avoid harsh chemicals or liquids, as they may damage the screen or internal components. For more thorough cleaning, lightly dampen the cloth with water, but ensure it is not soaking wet. Regular cleaning prevents dust buildup and ensures accurate temperature readings. Never submerge the thermostat in water or expose it to excessive moisture, as this can cause irreversible damage to the electronic circuitry.
8.2 Updating Software (if applicable)
Updating the Honeywell TH6220D1028 software ensures optimal performance and access to new features. Check Honeywell’s official website for the latest firmware version. To update, remove the thermostat’s faceplate and press and hold the “Menu” and “Next” buttons simultaneously to enter the update mode. Follow the on-screen instructions to complete the process. Always use the update file provided by Honeywell to avoid compatibility issues. Do not interrupt the update process, as this could cause system malfunctions. After completion, restart the thermostat to ensure the new software is fully integrated.
8.3 Checking Battery Levels
The Honeywell TH6220D1028 thermostat typically operates on a hardwired power supply, but certain models may include backup battery functionality. To check battery levels, locate the battery compartment, usually found on the back or bottom of the thermostat. Replace the batteries with the recommended type (e.g., AA or AAA alkaline) if the display indicates low power or erratic behavior. Always turn off the power to the thermostat at the circuit breaker before replacing batteries to avoid electrical shock. Regularly checking and maintaining battery levels ensures uninterrupted performance and accurate temperature control.
The Honeywell TH6220D1028 thermostat offers efficient, user-friendly climate control with advanced features like Adaptive Intelligent Recovery and EnergyStar certification, ensuring optimal performance and energy savings for your home.
9.1 Summary of Key Steps
Installing the Honeywell TH6220D1028 involves turning off power, removing the old thermostat, and mounting the wallplate. Drill holes for secure installation, then connect wires to the correct terminals. Mount the thermostat, program schedules, and customize settings. Test wiring and ensure proper operation. Follow safety precautions and compatibility checks to avoid errors. Refer to the manual for detailed instructions and troubleshooting tips to ensure optimal performance and energy efficiency.
9.2 Final Tips for Optimal Performance
Regularly clean the thermostat to ensure accurate temperature readings. Check and replace batteries as needed to maintain functionality. Update software periodically for the latest features and improvements. Utilize energy-saving settings like programmable schedules and Adaptive Intelligent Recovery. Always refer to the installation manual for troubleshooting and maintenance guidance. Ensure proper installation and wiring to avoid performance issues. By following these tips, you can maximize energy efficiency, comfort, and the lifespan of your Honeywell TH6220D1028 thermostat.